
Interfacing: B530 CO2 sensor and Gumstix
The group obtained some B530 CO2 sensors (produced by ELT, Inc.) to interface to some Arch Rock nodes as part of another project. The datasheet is located here. As a first iteration of my own CO2 sensing setup I borrowed one of the devices to connect to a Verdex Gumstix device. This article gives an overview of how I achieved this, along with some hints and gotchas related to using the sensor.
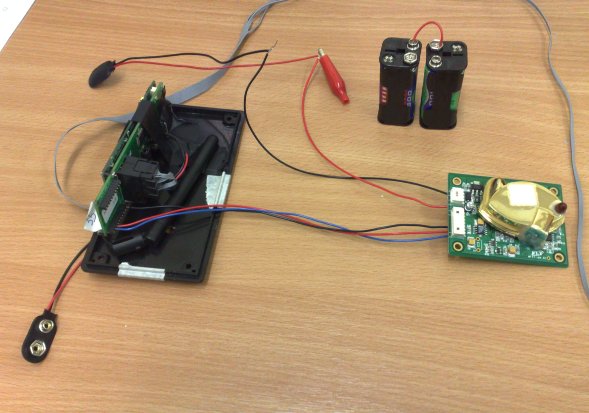
For the physical connection I used a serial port, which is in itself a bit of a minefield on the Gumstix platform. I will cover the Verdex but this should apply to the Connex as well. Bear in mind that they changed the meaning/use of some UARTs between revisions, so be careful. On our in-house expansion boards we are able to attach a MaxStream XBee radio module and fortunately this uses a serial port, so the data lines are already broken out for me on the connector and the choice of which UART to use has already been made (in this case STUART/IR[TX|RX]/ttyS2 to my knowledge). From here it was a simple matter to connect the serial lines on the B530 to the appropriate place on the expansion board. I fashioned a 9-10v power supply out of 8 rechargable AAA/LR03/AM4 cells and the hardware aspect was done for now. Making a robust connection and power supply was a task for a separate session. A picture of the final connected sensor is below. Note that it is hooked up to Medusa2’s upper body node, which is attached to part of one of the node box lids. This half-packaged state makes it really easy to handle without having to worry so much about ESD issues.
Next the software. As usual, everything is done in Python. The node needed the pySerial package installed, which in turn relies on the stringold package (and possibly other things that I already had installed). To open the sensor for reading, simply perform
dev = serial.Serial("/dev/ttyS2", 38400, timeout=6)
To open at the correct speed and with a timeout twice the amount of time between samples to ensure timing issues don’t cause a false timeout. Reading is then performed via
data = dev.read(11)
value = int(data[:4])
And there you go, simplicity itself thanks to the power of Python. As noted previously, the timeout is set to six seconds in order to allow for delayed readings. However, the sensor seems to provide samples on the specified three second interval to within about 0.01 seconds. A read is performed as often as possible and allowed to block until the next value is available.
Gotchas
There are a few things to look out for in you code when you are using the B530:
- I have on occasion missed a byte or two, resulting in the data I retrieve not being quite what I expect (for instance getting the last 9 bytes of one sample and the first 2 of the next). This may be a sensor fault, or it may be my physical connection being less reliable than expected. Either way I wrote a function to detect the start of a sample and realign the reads when needed. Of course, the problems seemed to immediately stop then (not because of the code), so the routine hasn’t been tested (and your mileage may vary).
- Yes, the sample size is 11 bytes. Even though the datasheet quotes 10 bytes and tells you what they should be, all of our B530 units give 11 byte samples. There is an extra 0x0A on the end.
- If the CO2 concentration goes above 10,000 ppm the sample you retrieve will have the characters OVER in place of the value, you need to check for this or the int() call will fail. This isn’t documented in the datasheet.
- It is, of course, much better to use dev.readline() rather than dev.read(11) with a fixed read size. This way you automatically get compensated if your devices suddenly start obeying the datasheet, and you know that even if you miss bytes then the next read should still be aligned with the start of the message correctly.