BNEP PAN Connections with BlueZ 4.x
When Ubuntu adopted BlueZ 4.x as its Bluetooth suite of choice a lot of things broke, especially if you were doing more than just connecting to your phone. Unfortunately for us, we were doing a lot more than that. This mean that under Intrepid we had to force a downgrade to the Hardy version of BlueZ (3.26 or 3.29), an option which vanished with Jaunty as the package installation threw errors.
Despite a lot of discussion of this issue, it seems to be quite hard to find a real solution where someone has said “install this, tweak this, that’ll fix it for you”. However, today I successfully created a PAN network between my desktop and a Gumstix device using BlueZ 4.x, and here’s how I did it.
Note that there is some configuration needed on the Gumstix side which is not covered here and will be the subject of a future post.
First, you need to add the Blueman PPA repository and GPG key to your software sources list. You can do this the graphical way as described on the website, or run the following commands:
sudo apt-key adv --keyserver keyserver.ubuntu.com --recv-keys 951DC1E2
echo 'deb http://ppa.launchpad.net/blueman/ppa/ubuntu jaunty main' | sudo tee -a /etc/apt/sources.list
echo 'deb-src http://ppa.launchpad.net/blueman/ppa/ubuntu jaunty main' | sudo tee -a /etc/apt/sources.list
Then you update your package list and install Blueman:
sudo apt-get update
sudo apt-get install blueman dhcp3-server
We install dhcp3-server so that the option is there to hand out IP addresses to clients on the PAN (the subject of another post). There is another method presented by Blueman, but I know nothing about that one, so I can’t advise.
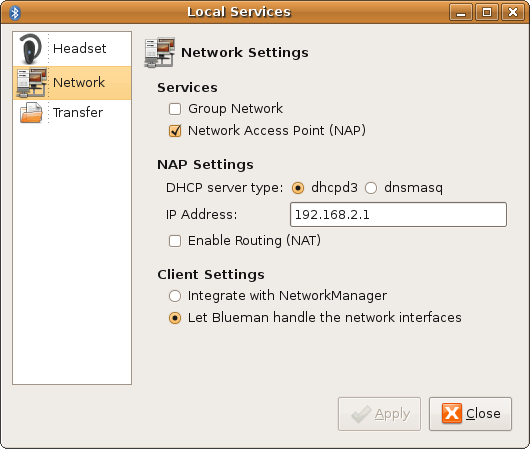
At this point you’ll want to log out and back in to make sure you have the Blueman applet running. Right-click on the Bluetooth icon (near the clock towards the right-hand side of the top panel with the default GNOME configuration, but usually only if you have Bluetooth hardware available). Click on Local Services, select Network, enable Network Access Point (NAP), select dhcpd3 as the DHCP server type, and enter the IP address you want to use for this machine. It should look like the screenshot below:

I have selected to let Blueman handle my connection because I don’t trust NetworkManager, you should be able to use whatever you’re happy with.
Now you just need to pair the Gumstix and your PC. As BlueZ 4.x enforces the use of PINs much more than 3.x did, you’ll need to add a boot script to your Gumstix (a symlink in /etc/rc5.d/ to a script in /etc/init.d/) with following contents:
#!/bin/sh
passkey-agent --default 0000 &
Replace 0000 with your desired PIN. Additionally, you’ll want to edit /etc/bluetooth/hcid.conf (also on the Gumstix device) to use the same PIN and set security to auto. One of these is used for incoming connections and one for outgoing. At this point you can either restart Bluetooth and run passkey-agent (or the startup script) manually, or you can just reboot the Gumstix device. I’d suggest the latter.
Next, left-click the Bluetooth icon on your PC to open the devices list. Click the search button and then right-click your Gumstix, click Add Device, then right-click again and select Bond. It should ask for the PIN at this stage, use the one you selected earlier. Now you can use pand on the Gumstix to connect to the PC and you should be asked for the PIN one last time, followed by a popup asking if you want to allow a BNEP connection. Test the connection by pinging the Gumstix device, but remember that STP is active on the bridge that Blueman creates, so there will be a delay before the ping attempts start to succeed.
